Setup OpenMediaVault NFS with Autofs and Docker
- Part 1: Setting Up NFS on Your OpenMediaVault Server
- Part 2: Client-Side Automation with Autofs
- Part 3: Integrating Autofs with Docker (The
rsharedMagic)
Managing network storage can be a headache, especially when you’re dealing with multiple services and containers. Manually mounting NFS shares is tedious, and getting Docker containers to reliably see those shares can be a whole other challenge.
In this post, these issues will be tackled head-on. An NFS share will be set up on your OpenMediaVault server, autofs will be configured on your client machine for automatic mounting, and the entire system will then be flawlessly integrated with Docker using rshared propagation to ensure your containers always see your data.
Let’s dive in!
Part 1: Setting Up NFS on Your OpenMediaVault Server
First things first, we need to ensure your OpenMediaVault (OMV) server is ready to share files via NFS.
-
Enable NFS Service: Log into your OpenMediaVault web interface. Navigate to Services > NFS.
-
Configure Share: Add your desired share. The crucial step here is to enable the
no_root_squashoption. This is often necessary for applications running inside Docker containers, especially if they need root-level access to the share, preventing permission issues.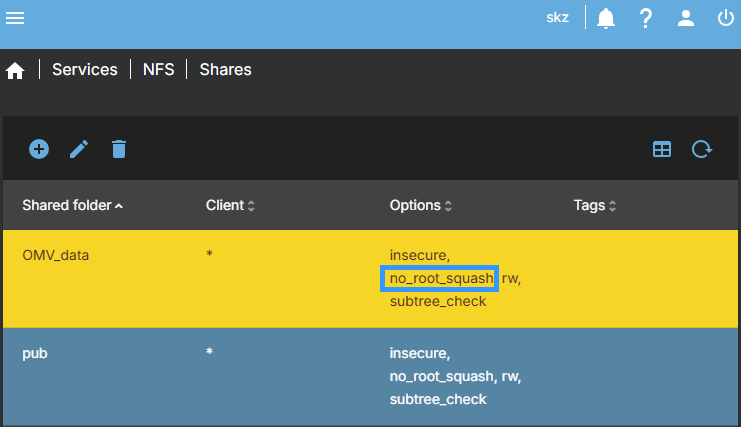
Make sure to apply the changes after configuring your share.
Part 2: Client-Side Automation with Autofs
Now, let’s move to your client machine (the one that will access the NFS share and run Docker). We’ll use autofs to automatically mount NFS shares only when they are accessed, and unmount them after a period of inactivity. This is far more efficient than static mounts in /etc/fstab.
1. Install Necessary Packages
Open your terminal and install autofs and nfs-common:
sudo apt update
sudo apt install autofs nfs-common
After installation, a reboot is recommended to ensure all modules are loaded correctly:
sudo reboot
2. Verify NFS Kernel Modules
It’s a good idea to check if the necessary NFS kernel modules are loaded.
lsmod | grep nfs
You should see output similar to this, indicating nfs, nfs_acl, and sunrpc modules are active:
nfsv3                  49152  1
nfs_acl                12288  1 nfsv3
nfsv4                 864256  0
nfs                   380928  3 nfsv4,nfsv3
lockd                 110592  2 nfsv3,nfs
sunrpc                516096  21 nfsv4,auth_rpcgss,lockd,nfsv3,rpcsec_gss_krb5,nfs_acl,nfs
If you don’t see these, the module might not be loaded, and you might need to investigate further (though a reboot usually fixes it).
3. Test the NFS Share (Optional but Recommended)
Before configuring autofs, you can quickly test if your client can see the OMV NFS share and prepare a temporary mount point. Replace 172.16.0.10 with your OpenMediaVault server’s IP address.
showmount -e 172.16.0.10
mkdir -p /mnt/nfs
umount /mnt/nfs # Ensure it's not already mounted
4. Configure the Master Map (/etc/auto.master)
The master map tells autofs which base directories to watch.
-
Open the file:
sudo nano /etc/auto.master -
Add the following line at the bottom. This defines
/mnt/nfsas the parent directory for your shares and points to/etc/auto.nfsfor the actual share definitions./mnt/nfs /etc/auto.nfs --timeout=600 --ghost/mnt/nfs: This is where your NFS shares will appear on your client./etc/auto.nfs: This is the map file we’ll create next, containing the specific share details.--timeout=600: Unmounts the share after 10 minutes (600 seconds) of inactivity.--ghost: (Optional) Keeps the mount point directories visible even when the share isn’t actively mounted.
5. Create the Map File (/etc/auto.nfs)
Now, let’s define the actual NFS shares from your OpenMediaVault server.
-
Create the file:
sudo nano /etc/auto.nfs -
Add your share details. Replace
172.16.0.10with your OMV server’s IP and/volume1/work,/volume1/backupwith your actual NFS export paths from OMV.omv -fstype=nfs,rw,soft,intr 172.16.0.10:/volume1/OMV_data- This will create directories like
/mnt/nfs/omvon your client. rwfor read/write,rofor read-only.soft,intrare common NFS options for better handling of server unresponsiveness.
- This will create directories like
6. Apply and Enable the Autofs Service
For the changes to take effect, restart and enable autofs.
- Restart autofs:
sudo systemctl restart autofs - Enable on boot:
sudo systemctl enable autofs - Check status:
systemctl status autofsEnsure it shows “active (running)”.
7. Test the Autofs Mount
Important: You won’t see the folders immediately if you just run ls /mnt/nfs. autofs only mounts them when you try to access them.
- Try to enter one of your defined directories:
cd /mnt/nfs/omv - Now, check your active mounts:
mount | grep nfsYou should see your NFS share listed!
Part 3: Integrating Autofs with Docker (The rshared Magic)
This is where many people run into issues. By default, Docker containers often don’t “see” autofs mounts. This is due to how Docker handles mount propagation.
The “Ghost Folder” Problem and Lack of Propagation
When Docker starts, if autofs hasn’t yet mounted the NFS share, Docker sees an empty directory on the host. It then “grabs” that empty state and maps it into the container. Even if autofs later mounts the NFS share on the host, the container remains stuck looking at the old, empty version of the directory.
Docker mounts are private by default. This means that while changes to files inside a mount are seen, a new mount (like NFS layering over a folder) is not propagated from the host to the container.
The Solution: rshared Propagation
To fix this, we use rshared (recursive shared) propagation. This tells Docker that when autofs mounts the NFS share on the host, that mount should also become visible inside the container.
Here’s how to implement it in your docker-compose.yml:
services:
  app:
    image: nginx
    volumes:
      # Use the 'rshared' flag to propagate the mount from host to container
      - type: bind
        source: /mnt/nfs/omv # This is your autofs mount point on the host
        target: /app/data           # This is where it will appear in the container
        bind:
          propagation: rshared
How it works: When your container tries to access /app/data, it touches the host’s /mnt/nfs/omv. This action triggers the host’s autofs daemon to mount the NFS share from your OpenMediaVault server. Because of rshared, that mount immediately becomes visible inside the container.
Practical Example: qBittorrent with OpenMediaVault NFS
Let’s look at a real-world example using qBittorrent, which often needs access to large download directories.
services:
  qbittorrent:
    image: lscr.io/linuxserver/qbittorrent:latest
    container_name: qbittorrent
    environment:
      - PUID=1000
      - PGID=1000
      - TZ=Asia/Ho_Chi_Minh
      - WEBUI_PORT=8080
      - TORRENTING_PORT=6881
    volumes:
      - ./qbittorrent/config:/config
      - type: bind
        source: /mnt/nfs/omv/torrents/downloads # Your autofs mount point for downloads
        target: /downloads                     # Where qBittorrent expects downloads
        bind:
          propagation: rshared
    ports:
      - 8080:8080
      - 6881:6881
      - 6881:6881/udp
    restart: unless-stopped
In this example, /mnt/nfs/omv/torrents/downloads would be an entry in your /etc/auto.nfs file, pointing to the actual torrents share on your OpenMediaVault server.
Conclusion
By combining OpenMediaVault’s robust NFS capabilities with autofs for intelligent, on-demand mounting and Docker’s rshared propagation, you can create a highly efficient and reliable storage solution for your home lab or server. No more manual mounts, no more “empty folder” surprises in Docker containers!