Configuring VPS to Access Home LAN via WireGuard
This guide provides a comprehensive walkthrough on establishing a secure WireGuard VPN connection between a Virtual Private Server (VPS) and a MikroTik router, enabling seamless access to your home Local Area Network (LAN) from your VPS. It details the necessary configurations for both the VPS and the MikroTik device, covering crucial steps such as WireGuard interface creation, peer setup, IP address assignment, routing, firewall rules, and Network Address Translation (NAT). By following these instructions, you will be able to securely extend your home network’s reach to your VPS, allowing you to interact with LAN devices as if you were directly connected.
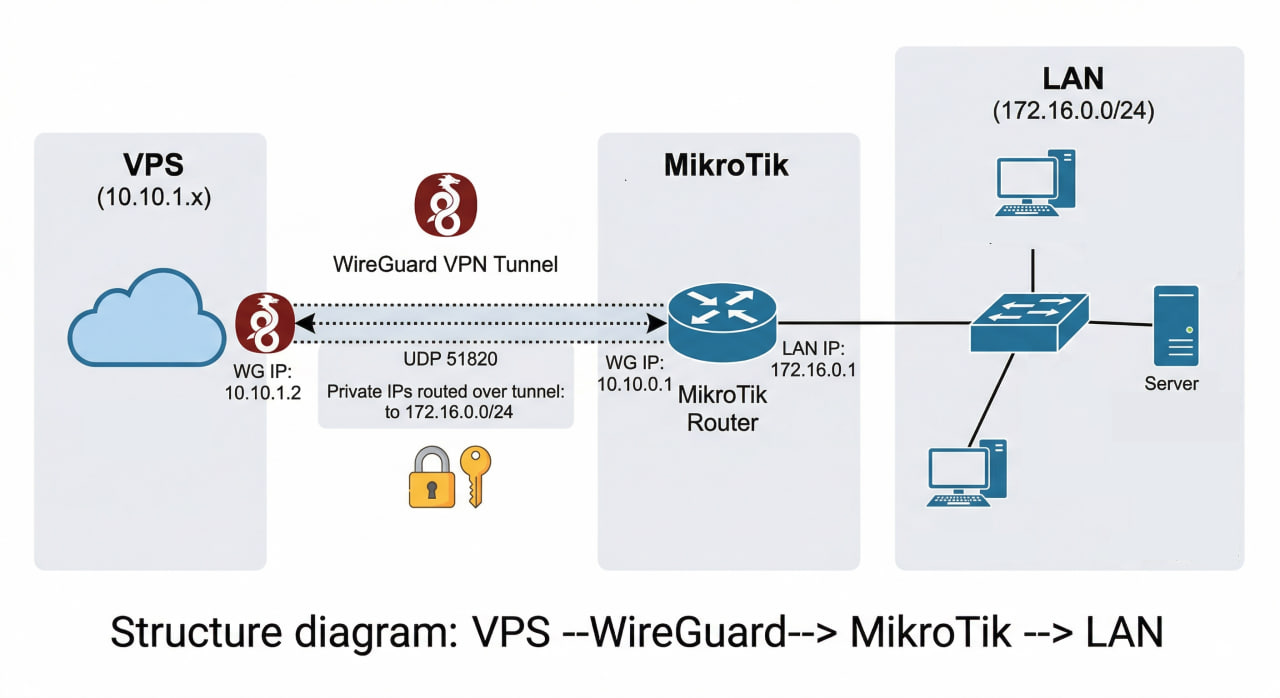
Actual Diagram
VPS (10.10.1.x) <--WireGuard--> MikroTik (10.10.0.1) <--> LAN 172.16.0.0/24
Required Configuration
On VPS — wg0.conf:
[Peer]
# MikroTik
PublicKey = <public_key_mikrotik>
Endpoint = <public_IP>:<port>
AllowedIPs = 10.10.0.0/24, 172.16.0.0/24   # ← must include the LAN subnet
PersistentKeepalive = 25
On MikroTik — 4 things needed:
| # | Command | Purpose |
|---|---|---|
| 1 | allowed-address=10.10.1.0/24 on peer |
Accept traffic from VPS |
| 2 | /ip route add dst=10.10.1.0/24 gateway=wg0 |
Know the return route to VPS |
| 3 | firewall filter forward accept in/out-interface=WireGuard |
Allow packets to pass |
| 4 | firewall nat masquerade src=10.10.1.0/24 dst=172.16.0.0/24 |
LAN devices don’t need to know the route to VPS |
1. Create WireGuard Interface
/interface wireguard
add name=wg0 listen-port=51820 private-key="<private_key_mikrotik>"
2. Assign IP Address to WireGuard Interface
/ip address
add address=10.10.0.1/24 interface=wg0
3. Add Peer (VPS)
/interface wireguard peers
add interface=wg0 \
    public-key="<public_key_vps>" \
    allowed-address=10.10.1.0/24 \
    persistent-keepalive=25s
allowed-addresshere is the VPS subnet — MikroTik will accept traffic from this range through the tunnel.
4. Add Route to Forward Traffic from VPS to LAN
/ip route
add dst-address=10.10.1.0/24 gateway=wg0
This route helps MikroTik know that traffic destined for
10.10.1.0/24should go through the WireGuard tunnel (in the reverse direction).
5. Configure Firewall — Allow Forwarding
MikroTik blocks forwarding by default if there’s no rule. Add the following rules:
/ip firewall filter
add chain=forward in-interface=wg0 action=accept comment="WG: VPS to LAN" place-before=0
add chain=forward out-interface=wg0 action=accept comment="WG: LAN to VPS" place-before=1
6. Configure NAT (Masquerade)
If devices in the 172.16.0.0/24 LAN do not have a return route to 10.10.1.0/24, masquerading is required:
/ip firewall nat
add chain=srcnat src-address=10.10.1.0/24 dst-address=172.16.0.0/24 \
    action=masquerade comment="WG: VPS -> LAN NAT"
This method is recommended if you don’t want to add static routes on each device in the LAN.
7. Open WireGuard Port on Firewall Input (if not already done)
/ip firewall filter
add chain=input protocol=udp dst-port=51820 action=accept \
    comment="WG: Allow WireGuard UDP" place-before=0
Check Connection
# View peer status
/interface wireguard peers print

# Check if handshake was successful
/interface wireguard peers monitor 0

# Ping VPS from MikroTik
/ping 10.10.1.1
From VPS, try pinging:
ping 172.16.0.1   # MikroTik LAN Gateway
ping 172.16.0.x   # Any device in the LAN
Summary of Important Steps
| Step | Purpose |
|---|---|
allowed-address=10.10.1.0/24 |
Allow tunnel to receive traffic from VPS |
ip route dst 10.10.1.0/24 |
MikroTik knows the return path |
firewall filter forward accept |
Allow packets to pass between 2 interfaces |
firewall nat masquerade |
LAN devices don’t need to know the route to VPS |