Pi Coding Agent with a Custom LLM via models.json
Pi Coding Agent is a terminal-based coding agent that is minimal and highly customizable, shipping with four core tools by default: read, write, edit, and bash. One of Pi’s strengths is that it lets you freely choose the LLM provider behind the agent — from major providers such as Anthropic, OpenAI, and Google, to self-hosted OpenAI-compatible APIs like Ollama, vLLM, LM Studio, or your own internal proxy.
This post walks you through installing Pi and configuring it to use a custom LLM (your own LLM/proxy) through a models.json file.
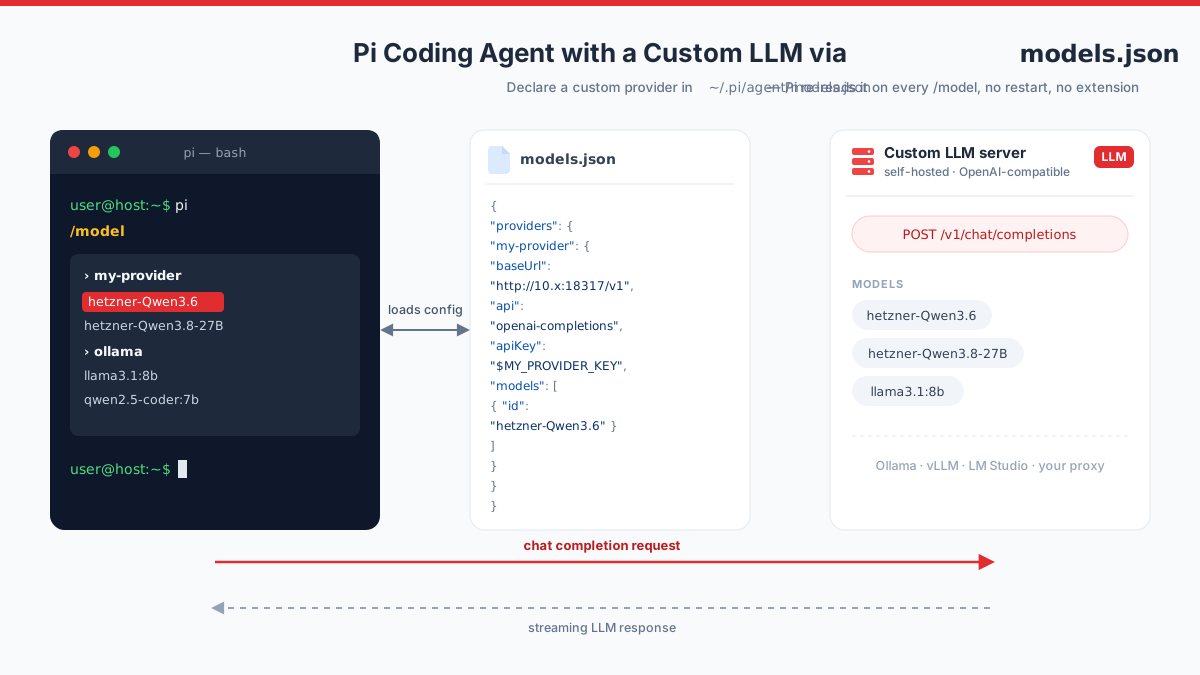
Pi reads the custom provider from ~/.pi/agent/models.json and talks to your self-hosted, OpenAI-compatible server over /v1/chat/completions.
1. Installing Pi
Before installing, make sure you have:
- Node.js (with npm)
- Python (used to build some native dependencies)
Install the official npm package from Earendil Works:
npm install -g --ignore-scripts @earendil-works/pi-coding-agent
The --ignore-scripts flag is recommended to disable untrusted install scripts from dependencies during installation.
2. Why custom LLMs can’t use /login
For major providers with subscriptions or OAuth (Anthropic, OpenAI, OpenRouter…), Pi supports quick authentication via the /login command right inside a session, or through environment variables such as ANTHROPIC_API_KEY or OPENAI_API_KEY.
Important: at the moment, /login does not support custom/user-defined LLM providers. This is an authentication flow reserved for providers with OAuth or subscription mechanisms built into Pi. For your own proxy or a self-hosted OpenAI-compatible server, the only way to declare it is to edit the configuration file ~/.pi/agent/models.json directly — which is also the fastest and simplest way for Pi to recognize your provider without writing an extension.
If your provider later needs a more complex login flow (its own OAuth, a custom login flow), that’s when you’d need to write an extension instead of using models.json, because models.json does not support that kind of authentication.
3. Creating the models.json file
By default, Pi reads custom provider configuration from:
~/.pi/agent/models.json
If the file does not exist yet, create it. The minimal structure to declare a custom provider pointing to your own proxy/server:
{
  "providers": {
    "my-provider": {
      "baseUrl": "https://your-proxy-endpoint.com/v1",
      "api": "openai-completions",
      "apiKey": "your-api-key",
      "models": [
        { "id": "your-model-id-on-your-proxy" }
      ]
    }
  }
}
Field descriptions:
| Field | Meaning |
|---|---|
my-provider |
A name you choose for the provider; it will show up in /model |
baseUrl |
The endpoint of your proxy/server — it must include the correct base path, e.g. /v1 if the server follows the OpenAI standard (/v1/chat/completions) |
api |
The API type the provider supports: openai-completions (the most common, OpenAI-compatible), anthropic-messages, or google-generative-ai |
apiKey |
The authentication key — you can put the raw value, use $ENV_VARIABLE_NAME to read it from an environment variable, or a placeholder value if the server doesn’t check the key (like Ollama) |
models |
The list of models this provider exposes; only id is required, other fields (name, contextWindow, maxTokens, reasoning, cost…) are optional and improve how it displays |
Example with an internal proxy
{
  "providers": {
    "skywirex": {
      "baseUrl": "http://10.10.38.1:18317/v1",
      "api": "openai-completions",
      "apiKey": "sk-xxxxxxxxxxxxxxxxxxxxxxxxxxxxxxxxxxxx",
      "models": [
        { "id": "hetzner-Qwen3.6" },
        { "id": "hetzner-Qwen3.8-27B" }
      ]
    }
  }
}
Example with a local Ollama
{
  "providers": {
    "ollama": {
      "baseUrl": "http://localhost:11434/v1",
      "api": "openai-completions",
      "apiKey": "ollama",
      "models": [
        { "id": "llama3.1:8b" },
        { "id": "qwen2.5-coder:7b" }
      ]
    }
  }
}
The apiKey here is just a placeholder value because Ollama doesn’t check the key, but Pi still requires this field to be present for the models to show up in /model.
4. Securing your API key
Instead of hard-coding the key directly in the file (easy to leak when sharing or committing to git), use an environment variable:
"apiKey": "$MY_PROVIDER_API_KEY"
export MY_PROVIDER_API_KEY="sk-xxxxxxxxxxxxxxxxxxxxxxxxxxxxxxxxxxxx"
5. Launching and verifying
After saving the file, open Pi in your project directory:
pi
Type /model to check whether your custom provider and models appear. The models.json file is re-read every time you open /model, so you don’t need to restart Pi after editing the file — just open /model again to see the changes.
To quickly check from the command line without entering the interactive interface:
pi --list-models | grep my-provider
6. Troubleshooting common issues
404 page not found error: the most common cause is a baseUrl missing the standard base path (usually /v1). With api: "openai-completions", Pi automatically appends /chat/completions to the end of baseUrl. If your proxy exposes an endpoint like /v1/chat/completions and your baseUrl doesn’t include /v1, the request will go to the wrong path. Verify the correct path by hitting the proxy directly with curl before debugging inside Pi.
Model not showing up in /model: check whether the JSON file is valid (python3 -m json.tool ~/.pi/agent/models.json) and make sure the file is at the correct path ~/.pi/agent/models.json. On Windows, note that you should save the file as UTF-8 without BOM, since a BOM can cause the JSON parsing to fail.
Model shows in /model but calls hang with no response: some versions of Pi have limitations with fully custom providers that aren’t in the built-in list — if you run into this, check Pi’s changelog/issue tracker for related fixes.
7. Setting up project guardrails (recommended)
By default, Pi has full permission to run bash commands and edit files without asking for confirmation. To keep control:
- Create an
AGENTS.mdfile at the root of your project to pass instructions/rules to Pi at startup. - Run Pi inside a sandbox (MicroVM or Docker container) if you want to isolate the risk of unwanted bash commands.
With the steps above, you can connect Pi Coding Agent to any custom LLM — whether an internal proxy, a self-hosted server, or an intermediary gateway — entirely through editing models.json, without waiting for Pi to support /login for that provider.